An email from Tom M.
“My question concerns both tools and technique. It seems you usually paint on the light table. So how do you ensure continuity of technique, with adjacent panels being neither too dark nor too light, without waxing up your glass?”
Tom is right.
We usually paint on the light table
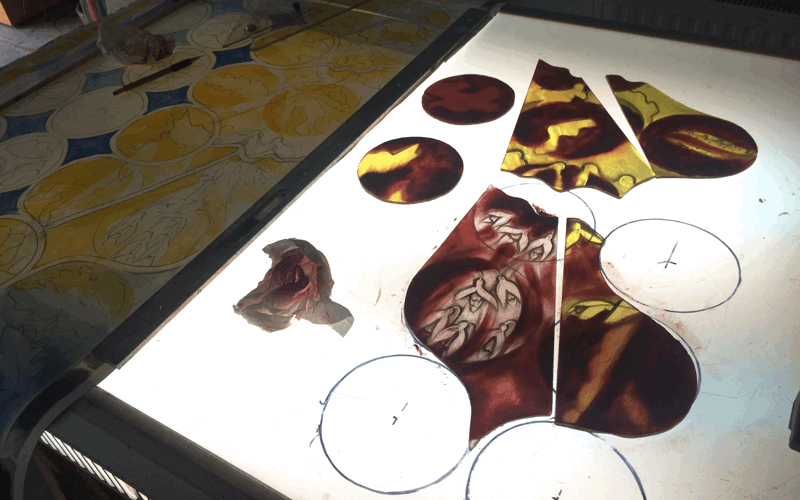
Yes, we usually work flat as here with silver stain:
Usually. There are however key stages when we attach the many bits of coloured glass to big sheets of 6 mm strengthened glass.
For instance, when we’ve finished cutting, and we want to see how the unpainted colours work together:
Or near the end of painting, when we want to see how legible our lines and shadows are:
These are times when we want to put as much glass as possible in a similar light to how it will be seen.
Other times - it’s just the way we work, the way which works for us - we use the light table to go as far as we can.
And Tom’s question is: working on the light table, what keeps us consistent from one piece to the next, from one panel to the next?
Ingredient number #1: imagination
We’ll begin with “imagination” because, when I started learning, I mistakenly sought proof. A guarantee. I wanted to be sure. Which now I understand just isn’t possible. And “imagination” draws attention to this fact. Because waxed up or flat, we’re always forced to make a judgement beyond what we can possibly know for sure:
The window isn’t leaded.
The quality of light is different from where the window will eventually go.
The angle also.
Not to mention how some projects will be too big to display them as they’ll eventually be seen. That’s why, whether flat or vertical, in natural light or artificial, it’s always just a test. Only your finished, fitted piece is the real performance. You cannot know. You must imagine. And if this seems bleak, just be assured how imagining the outcome is not the same as guessing: there’s a lot you can do to feed your imagination and give it foresight. For instance:
Ingredient number #2: test pieces
So for instance, before we choose the colours and cut the glass, we might paint five or 50 test pieces which reveal the effect of layering techniques in different ways.
E.g. undercoat, light trace, flood, strengthen, highlight, fire, enamel, and fire again.
Or: light trace, wash, reinstate, strengthen, highlight, glycol shadows, glycol details, fire, stain and fire again.
And so on.
At the end of this Beauty Show, we’ll pick one or several of our test pieces to go forward to the next round.
So now we’ll start to have a sense of purpose.
Yes, it’s true: before we started testing, our imagination was too blind for comfort.
Which may surprise you since people often write and ask us, “How do I paint a face like this?” - and the amazing thing is, they believe we already know the answer. And I sense they get frustrated when we write back, “It might be this way, or it might be this way, or it might be this way, or …”
"Frustrated"?
Yes, because they say, “Yes but which way?!?!?” - and all I can reply is, “I don’t know, I haven’t done my five or 50 tests …”
Till we’ve done our five or 50 tests, our imagination is blind.
And I don’t want you to think it’s inexperience if you discover it’s the same for you.
Ingredient number #3: prototypes
But even with these test pieces which we decide to trust, we still don’t know enough to risk cutting 20 sheets of glass:
That’s where a prototype can help. That is, a painted, fired, leaded, cemented, polished section of a window. We make prototypes if the window’s big or its light conditions are peculiar. This way we can take the prototype to our client’s building and look at it in situ. We can check a purple or a blue or red etc. is reacting as we believed it would. Or that our shadows and highlights are strong enough. But just as when you wax your glass against an easel to see it vertically in daylight, so also with the prototype: it’s always just a test.
The responsibility is still ours to interpret the result. We must still use our imagination and experience.
Again we must embrace the risk of failure here: it’s not possible to know.
This risk might stop us sleeping well.
But the sense of danger also helps us find the strength to concentrate for many months.
Ingredient number #4: batch-processing
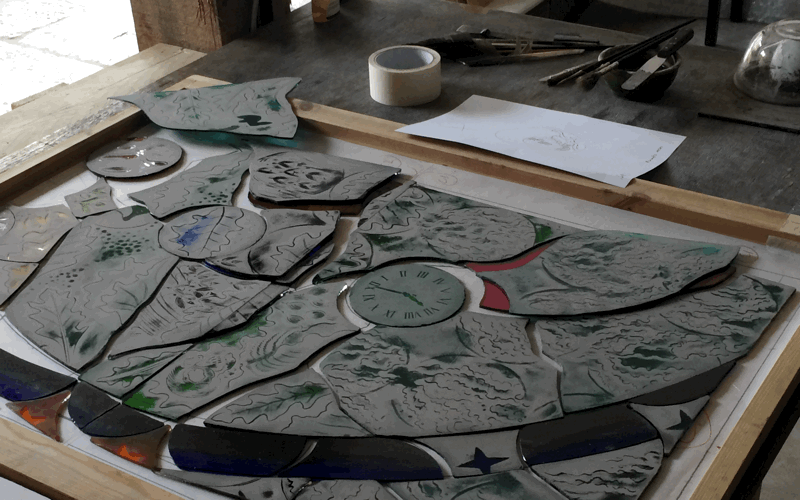
Now we cut the glass. And like you saw earlier, we’ll probably attach it all unpainted to a sheet of strengthened glass to verify our choice of colour. All being well - it never is though: we always replace this piece and that - next comes painting. The first method we use to keep everything consistent is batch-processing. So we undercoat a lot of glass at once, say 30 pieces. Then copy-trace them all:
Then flood and strengthen them etc. This means you focus on one brush, one consistency of paint, one sequence of actions: this is far easier than jumping around from undercoat, to trace, to flood, and back to wash again, endlessly repeated.
Of course, by consistently repeating a process, we could consistently go wrong.
We admit, the risk is there. And nothing will make it go away. Same answer as before: there is no proof, and it’s precisely this which makes us pay attention.
Ingredient number #5: the companion piece
But you don't like mistakes and nor do we. That’s why, before we start each stage - e.g. before we move from tracing to strengthening - we paint a “companion piece”:
It helps us confirm our paint is the right consistency and density of pigment.
It validates our choice of brush.
And it gives us time to practise the pace this particular technique requires e.g. flooding is faster than tracing.
This means, right at the start, we get our undercoat the way we want it - and just repeat.
Then we get our trace-lines as dark or light as they should be - and just repeat. It’s one of those situations where, by saying to yourself “It doesn’t matter if my companion piece goes wrong”, you usually paint it right, and then you’re confident enough to do the other 29.
Not just "paint" - also highlights.
Here's a short video where you see "softening" the companion piece, then "softening" the main piece. It all goes well - thanks to the opportunity you have of practising beforehand:
If you want to get confident with the key techniques, join our foundation course Illuminate
Ingredient number #1 again: imagination
But another point to bear in mind is: don’t you feel that some variation is good and human?
After all, this isn’t printing.
Yes, you might trace 30 pieces one after the other (and then move on to flooding 30 pieces) all in the name of efficiency.
But it’s still not mechanical.
Which means that sometimes you compare your glass with your test piece and notice a darkening of the lines and say: “This is fine - yes: my imagination tells me this will be fine”.
And anyway the glass is often different
Now we don’t know which country you’re in, but here in England we can still buy good quantities of antique mouth-blown glass.
This glass varies in density of colour from one side to another.
So the glass itself brings variation, which we don’t try to conquer.
Rather, we value the way neighbouring pieces of the ‘same’ blue will differ slightly from one another, depending on where we cut them in the sheet.
For us, chance differences like this are fine. We’re relaxed about them.
And the reason we’re relaxed is, we know how there are places we’re in charge. As in life, so with glass: control what you can and relax about the rest. That’s what works for us. That’s what we do to get the continuity we want from one panel to the next. That's enough from us.


