Kiln-fired stained glass painting
The essential brushes, paints and tools
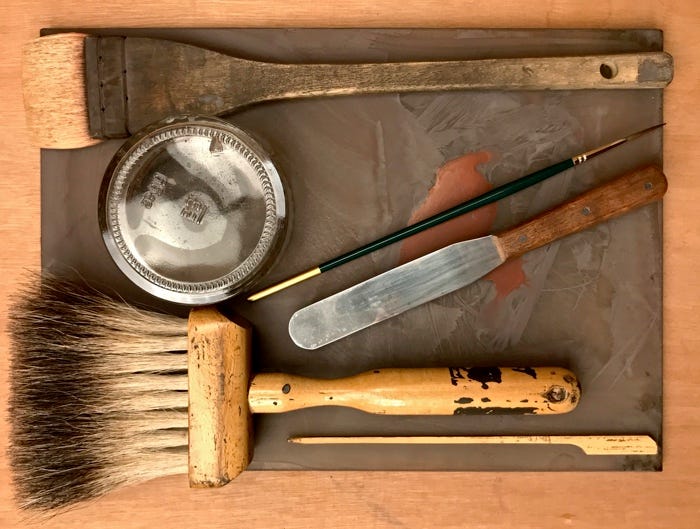
For the key techniques of kiln-fired stained glass painting, here’s a checklist of the essential brushes, tools and paints you’ll need.
Key techniques: how to trace, strengthen, flood and highlight, and how to apply a wash or “undercoat” of paint.
Checklist
Brushes:
A 3-inch badger blender
A large Ron Ranson hake brush
A tracing brush
For your paint:
Glass paint made by Schilling / Reusche
Some liquid gum Arabic made by Winsor & Newton
A small, clear glass pot
A large clear glass bowl
A jar or bowl for water – must be wide enough to fit your hake brush comfortably
Various spoons
A few cloths
Two strong palette knives
A palette made of glass
Other tools:
A highlighting stick
A painting bridge / arm-rest
A light-box
Optional for now: a kiln
And some glass.
That’s the checklist.
In a moment, we’ll give you details.
Please remember that this book of ours is excellent:
It comes with 12 online videos so you see how we use the brushes, tools and paints.
You’ll find the book on Amazon, iTunes, Barnes & Noble, or you can order it from your bookseller.
The hardback is expensive. This is because it contains a lot of photographs. The e-book is very reasonably priced.
Links here.
Both the hardback and the the e-book give you a lot of information we cannot give you on this page here.
Onwards, now.
Brushes
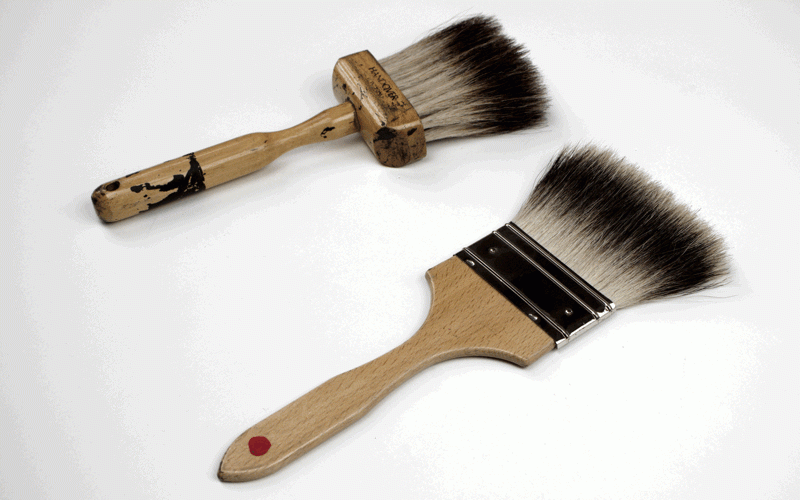
A badger blender
You’ll need a brush like either one of these:
The wooden shaft is between 5 and 6 inches long (125 – 150 mm). This length allows you a firm but flexible grip.
Be wise to this: some badger blenders cost a huge amount of money, but the ones you see above do not cost a lot of money. They are perfect and could easily last you 20 years.
A large Ron Ranson hake brush
The brand is important – Ron Ranson: we’ve tested others, and they didn’t work as well for us.
You need the ‘large’ size: it’s 1.75 inches across (45 mm).
Again, if you look after it, this is a long-lasting brush. It could last five years and could easily last for 10.
Tracing brush
We do nearly all of our tracing with just one brush: with a good tracing brush, you might be amazed by how many thicknesses of stroke you can achieve. Our favourite brand is made by Pro Arte, an English company, which sells across the world. This tracing brush we mostly use is the Renaissance sable rigger, size 2.
In the UK, we buy our tracing brushes from Jackson’s Art Supplies. You can use their search box to search for “renaissance sable rigger”. Jackson’s product code for size 2 is BPRSR2.
You should buy several, because, unlike the badger blender and the hake brush, your tracing brushes do wear out every few months.
If you’re ordering from overseas, you could also buy a size 1 and a size 3 at the same time, though you won’t need them to start with.
If you can’t find a stockist in your country, these are this brush’s key features, the features you must find in some other tracing brush. After all, there is nothing magical about the brushes we use. It all comes down to what the physical brush itself is like.
Natural hair, in this case sable (not ox, pony or squirrel; not nylon)
A pointed tip (not flat, not fan-shaped, not a mop or a cat’s tongue or a chisel)
The overall length of hair is just under .75 inch (18 mm) – this is fairly short
Size 2 in a range which goes from 0 to 6. In other words, it’s fairly thin
Slim, not round – just a slight swelling above the middle
Pro Arte makes this “Renaissance” range for water-colour painters, not for glass painters: that’s another useful piece of information for you, because our own experience of tracing brushes made specifically for glass painters is they are bad to learn with. That’s right: Pro Arte’s water-colour brushes are better for glass painting than a lot of so-called glass painting brushes.
A.S. Handover of London makes a similar range of short-length, pointed, sable brushes called “Series 99”. These are lovely brushes.
Another good alternative is made by Winsor & Newton. It’s called the “artists’ water-colour sable rigger” (sizes 2 and 1).
For your paint
Glass paint
We recommend you mix a lump of glass paint from glass paint made by Reusche, now owned by Schilling.
Our standard mix is about 3 parts Reusche tracing black (DE401) mixed with 1 part Reusche tracing brown (1134).
If you can’t get this particular tracing brown, then umber brown (1139) or bistre brown (DE402) are fine.
Reusche’s lead-free paints are also fine.
Here’s the Reusche/Schilling catalogue.
How much paint? At least 2 ounces / 50 grams of whatever black you choose, and one ounce / 25 grams of brown. Of course though, the more paint you have, the more you can practise.
To make your lump, you use water and liquid gum Arabic. We recommend Winsor & Newton: Amazon UK, Amazon US, Amazon CA.
Liquid gum is important because:
It’s easier to disperse throughout your paint, and
It’s a standardised strength so you quickly learn to estimate how much you’ll need.
For our studio work, and also for all our demonstrations on this website, we always mix a large amount of glass paint. For how and why we do this, see here:
To mix a small lump of glass paint – it’s OK to do this the first time you mix paint, to get a feel for what you’re doing – see these two posts here:
and here:
If (when) you become obsessive about your glass paint, see this ebook and 7 videos here.
A small clear glass pot and a large clear glass bowl
While you work, you use the small glass pot to cover your lump. This slows down the rate at which it dries. You also use it to seal your lump when you’re not using it. The most important feature is: the pot has a flat lip (not a round one), because a flat lip makes good contact with the palette. See here:
In the US and Canada, a company called Marie Morin makes desserts you can buy in supermarkets: these are perfect to seal your paint. In the UK, there’s a company called Gü:
You can also buy small pots from cooking shops or Amazon.
You use the large glass bowl to mix your paint. Later, it helps keep your paint fresh if you double-seal it at the end of a painting session, the small pot covering your left-over paint, the large bowl on top:
Wide jar or bowl for water while your painting
A wide jam jar is fine provided that it really is wide.
A low small heavy bowl like this is perfect:
Two palette knives
It helps to have two sturdy knives because, after mixing, or when you’ve finished for the day, you use one of them to scrape the other clean.
The handle is about 3 inches long, 3/4 inch wide (75 mm long, 85 mm wide): solid enough for a good, firm grip.
The blade is about 4 inches long and 1 inch wide (100 mm long, 24 mm wide): wide enough to crush and grind your paint, and long enough that you don’t scrape your knuckles when you apply strong downward pressure. Yet the blade is still short enough for maximum efficiency.
Palette
We recommend a piece of glass whose dimensions are roughly the size of an A4 piece of paper (279 mm by 210 mm), so a bit bigger than the size of a US letter.
Our point is: not a small palette like some adult education classes sometimes hand out - you need the space to mix and maintain your paint.
The glass must not be thin, else it could snap, so 4 mm thick at least.
Toughened or strengthened glass is excellent.
Sandblasted underneath is helpful since there are times when, with an illuminated light-box underneath, this change in texture will help your eye pick out your palette’s edges. (In the olden days, a sandblasted side also helped you grind your paint more quickly, but today’s glass paints are so well ground straight from the packet, the problem doesn’t arise.)
Your palette must have grozed or bevelled edges, or else you’ll slash your brushes which will cost you money and waste your time.
Other tools
Highlighting stick
You can sharpen the end of an old brush or use a wooden burger skewer or sandwich skewer, preferably bamboo because they will stay sharp for longer. These are excellent to cut through the undercoat or to trim a trace-line:
Bridge / arm-rest
Your bridge does not need to be wider than an inch. But it must be strong enough that it doesn’t sag when you lean on it.
It should be at least 12 inches long (300 mm), one inch wide (25 mm).
You’ll need to bear in mind how big your light box is: your bridge’s length must obviously be smaller, or else there is the risk you’ll topple over while you’re working.
The bridge must be smooth where you will lean on it with your hand and glide your skin along it.
The legs must be higher than the glass you plan to paint: say, one inch high (25 mm). The higher the legs, the wider they must be, to ensure your bridge is stable.
You easily can make your own. Make one, test it and see how it is for you, then adjust it or make another.
Spoons
A teaspoon and a dessert spoon are useful to measure and mix your paint.
Cloths
Cloths like these are good for cleaning the light box or mopping up spills or drying your glass:
Light-box
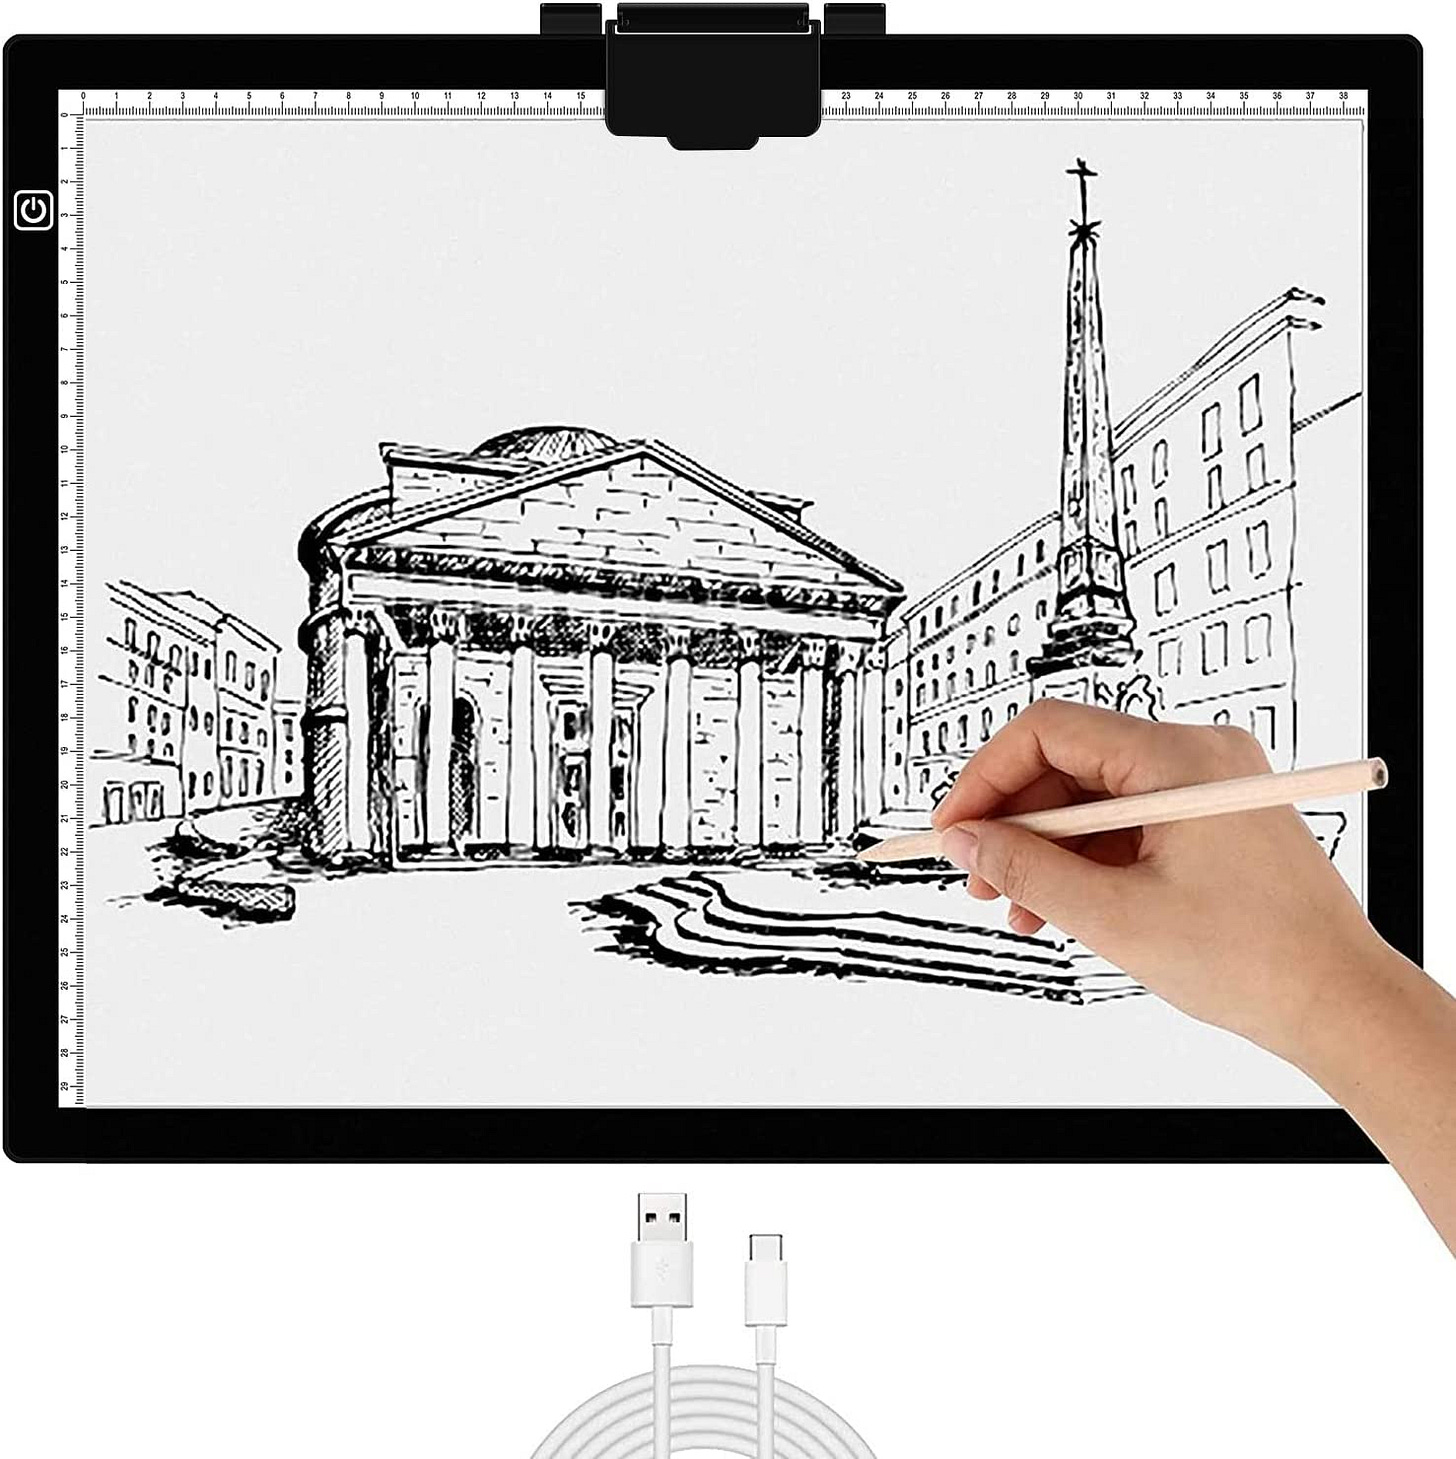
You can buy one or make your own. These days we use a lot of LED “tracing pads” like this:
They’re light and thin - easy to tidy away. They don’t give off much heat, which means they don’t dry out your paint as some lights do.
The main drawback is that the top (along with all the casing) is made from plastic: it scratches easily, and you cannot dab paint on it as you’ll want to, to test your paint while you are working. This means you’ll also need to buy a sheet of toughened or strengthened glass to place on top.
There are many ways to make your own light box. Those of you who’re good at carpentry can figure it out without us telling you how to do it.
Those of you who’re good at other things, here’s a different way. You’ll need:
A solid table
Four strong blocks – each one about 6 inches high (150 mm)
A toughened sheet of opaque glass, rounded at the edges so you don’t cut yourself
Some form of plug-in, splash-proof, low-heat lighting
You position the lighting on top of the table. You place the blocks where they can support your glass. You rest a corner of the glass on each block. And there you have it: a perfectly adequate, do-it-yourself solution which you can also put away.
Here’s David teaching in the US in 2014 (tough plastic flowerpots to support the toughened translucent glass, kitchen strip lights beneath):
Another method is to buy a length of white oilskin table-cloth, and work only with reflected light:
Clearly, white table-cloth won’t bounce back as much light as a light box does. But it will enable you to practise.
Kiln
Don’t imagine you must have a kiln to learn: you can practise and learn a lot without one. Certainly, if you can fire your glass, that’s great. But if you can’t, it’s needn’t be a problem: you’ll still have done the work and learned the key techniques. Your glass paint won’t be permanent and shiny - that’s all.
If you’ve got a kiln of your own, you’ll need to do some tests to get to know how hot you need to set it to get the desired result. This schedule varies somewhat from kiln to kiln.
Reusche/Schilling glass paints need a top temperature of approx. 660 celsius / 1220 Fahrenheit.
If you don’t have a kiln, some glass studios will hire you one.
Here are some notes on kilns and firing from our book:
Glass
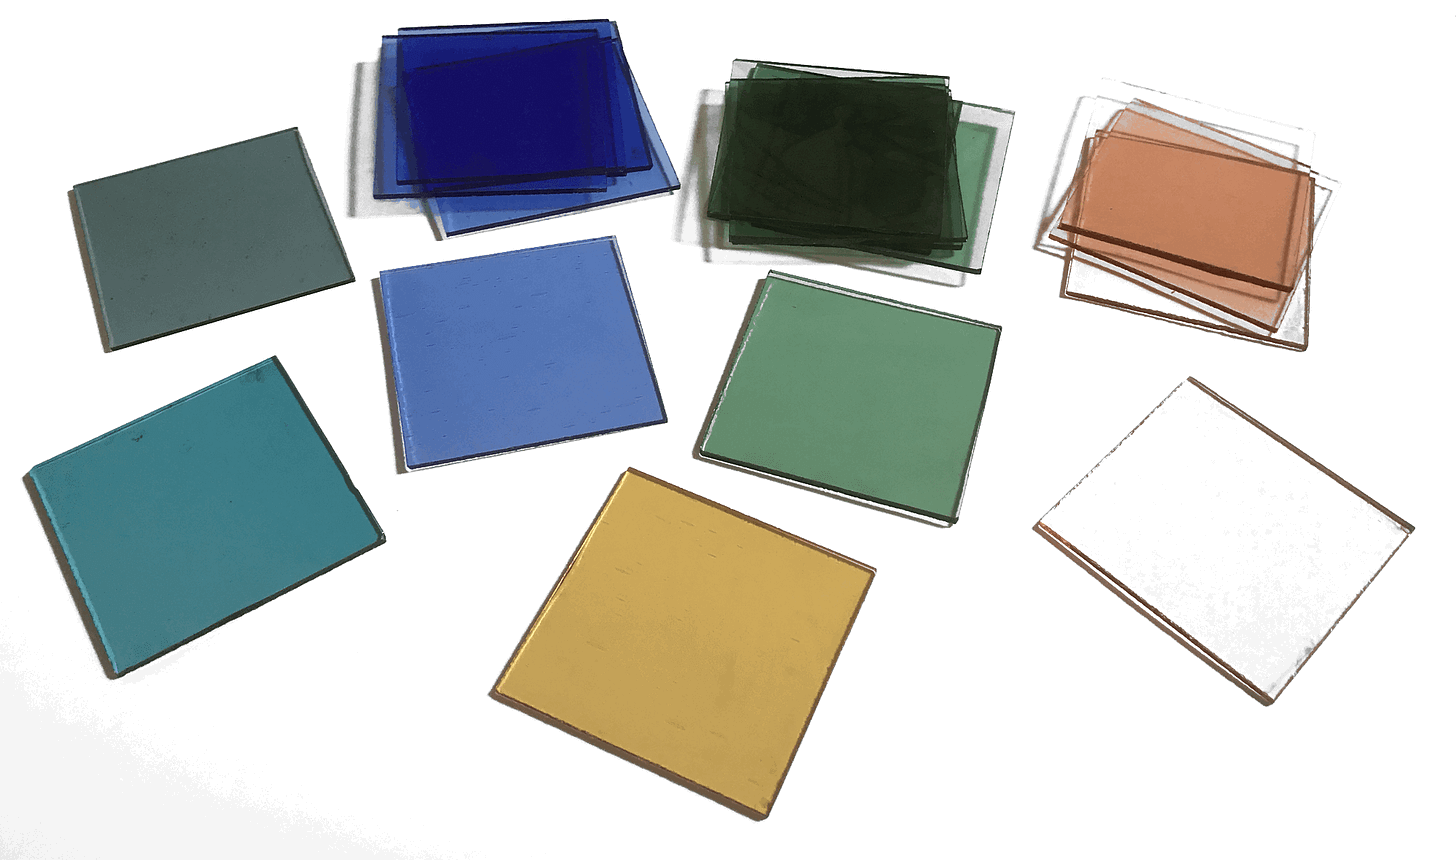
Float glass / window glass is all right, but light yellow or light green or light pink are far better when you’re learning:
Avoid dark colours, however lovely they seem, at all costs: they make it difficult for you to see the design which you are tracing. This challenge is acceptable once you’re confident with the key techniques; but when you’re learning, it’s demoralising.
Smooth glass, or only a little bit of texture - texture is not helpful while you’re learning. It’s like learning to drive on a road that’s full of potholes.
Suppliers
Now we want to tell you about the suppliers we’ve used or believe are reliable. As a point of principle, we don’t take commission from anyone. Loss of earnings is the price we gladly pay to maintain our integrity. Imagine a world where everyone behaved that way.
Brushes
Jackson’s Art Supplies in the UK for Ron Ranson large hakes, Pro Arte Renaissance tracing brushes, Winsor & Newton artists’ water-colour sable riggers.
A.S. Handover in the UK for Series 99 short-haired, pointed, sable tracing brushes.Cheap Joe’s Art Stuff in the US for Ron Ranson large hakes.
PELI Glass Products in the Netherlands: very attentive, nearly world-wide service) for Ron Ranson large hakes, Pro Arte Renaissance tracing brushes, 3 inch badger blenders, and just about everything for the glass painter. PELI even has a kit – everything you need to start with.
Creative Glass Guild in the UK has everything.
Glass paint etc.
Our recommendation: tracing black (DE401) / lead-free (57R001) mixed with tracing brown #1 (1134) / lead-free (56R0023).
If you can’t get that tracing brown, then substitutes are: bistre brown (DE402) / lead-free (56R002), or umber brown (DE403) / lead-free (56R003).
PELI Glass Products in the Netherlands for nearly all glass paints.
Reusche & Co. in the US for all glass paints (minimum line orders of 8 ounces / 225 g.). See their website for stockists selling smaller quantities.
Gum arabic liquid
Jackson’s Art Supplies in the UK.
PELI Glass Products in the Netherlands.
Bridges and palette knives
PELI Glass Products in the Netherlands.
Creative Glass Guild in the UK.
Kiln-makers/stockists
Kilncare Ltd. in the UK.
Paragon Industries, L.P. in the US.
PELI Glass Products in the Netherlands.
Skutt in the US.
Creative Glass Guild in the UK.
Glass
Remember: window glass is OK but pale yellow or pale green or pale pink are wonderful so please get some if you can. Little or no texture.
Excellent pale yellows and greens from here (and many other places):
Lamberts Glas GmbH in Germany.
PELI Glass Products in the Netherlands.
Creative Glass Guild in the UK.
Tatra Glass in the UK.
Creative Glass Guild in the UK.
Verrerie de Saint Just in France.
Our book
This book will serve you well if:
You’re new to traditional stained glass painting and are uncertain which brushes, paints and tools to buy – this book will tell you what you want to know. The accompanying 12 free videos will also introduce you to the key techniques.
You’ve painted stained glass for a while but you worry “Is it my lack of skill which is the problem? Or is it my brushes, paints and tools which stop me achieving the results I want?” – this book will guide you to the answer. And the 17 free designs will give you an excellent resource with which to practise.
You’re a teacher who wants your students to experience the joy of mastering this wonderful craft – this book will show you the smallest, most effective set of brushes, paints and tools to place before them so they can triumph.
Formats
Hardback
ebook
Available from
Booksellers (ISBN 978-1-9996189-0-2) and online
Amazon UK | US | Canada | Australia | France | Germany | Italy | Spain | Japan


In regards to the kiln trays you use for whiting, where does one acquire those?